
(Lymphoma) Is Glofitamab Monotherapy and Glofitamab + Gazyva Combination Therapy Effective?
Medical Supporter — Informationshinweis
Dieser Artikel ist eine Zusammenfassung internationaler medizinischer Informationen und stellt keine medizinische Beratung dar; er ersetzt nicht die Diagnose oder den Behandlungsplan Ihres behandelnden Arztes. Die dargestellten Informationen stammen aus öffentlichen Veröffentlichungen und offiziellen Angaben führender japanischer medizinischer Einrichtungen; Eignung und Wirkung einer Therapie sind individuell und müssen von einem qualifizierten Arzt beurteilt werden.
- December 24, 2021
- Read time: 1 minute
From December 11–13, 2021, Franck Morschhauser et al. of Service des Maladies du Sang presented at the 63rd American Society of Hematology Annual Meeting the efficacy and safety results of anti-CD20/CD3 bispecific antibody Glofitamab monotherapy and Glofitamab + anti-CD20 antibody Gazyva in heavily pretreated relapsed/refractory follicular lymphoma patients.
This trial divided heavily pretreated relapsed/refractory follicular lymphoma patients into the Glofitamab group (N=53) and the Glofitamab + Gazyva group (N=19). Evaluation endpoints were objective response rate and safety.
Patients were grouped by age and treatment history: the Glofitamab group had a median age of 64 years with a median of 3 prior treatments; the Glofitamab + Gazyva group had a median age of 61 years with a median of 2 prior treatments.
Trial results showed that the Glofitamab group's objective response rate was 81% (N=43), complete metabolic response rate was 70% (N=37). The Glofitamab + Gazyva group's objective response rate was 100% (N=19), complete metabolic response rate was 73.7% (N=14).
Subgroup analysis of patients who failed anti-CD20 antibody and alkylating agent therapy showed complete metabolic response rates of: Glofitamab group 50% (N=8), Glofitamab + Gazyva group 43% (N=3). Patients with disease progression or death within 24 months of treatment initiation were: Glofitamab group 58% (N=11), Glofitamab + Gazyva group 70% (N=7). Patients who failed PI3K inhibitor therapy: 43% (N=3) and Glofitamab + Gazyva group 50% (N=1).
Regarding safety, the most commonly confirmed adverse events were: cytokine release syndrome — Glofitamab group 66%, Glofitamab + Gazyva group 79%; neurological disorders — Glofitamab group 16 patients, Glofitamab + Gazyva group 10 patients (Grade 1: 17 patients, Grade 2: 9 patients). Other adverse events included: Glofitamab group — fever 28%, infusion reactions 28%, neutropenia 26%; Glofitamab + Gazyva group — neutropenia 58%, anemia 37%, thrombocytopenia 26%.
Based on the trial results, Franck Morschhauser et al. stated: In heavily pretreated relapsed/refractory follicular lymphoma patients, anti-CD20/CD3 bispecific antibody Glofitamab monotherapy and Glofitamab + anti-CD20 antibody Gazyva demonstrated good responses, with Glofitamab safety within manageable range.
Source: https://ash.confex.com/ash/2021/webprogram/Paper148778.html
Medical Supporter was formerly certified as an international medical visa guarantor by Japan's Ministry of Foreign Affairs and the Ministry of Economy, Trade and Industry (B-066).
Behandlung in Japan im Blick? Brauchen Sie Informationen und Unterstützung?
Wir helfen Ihnen, die für eine medizinische Reise nach Japan nötigen Informationen zu ordnen, kontaktieren japanische Einrichtungen und organisieren eine Zweitmeinungsberatung.Die Erstberatung ist kostenlos; ein Berater hilft Ihnen, die nächsten Schritte zu klären.
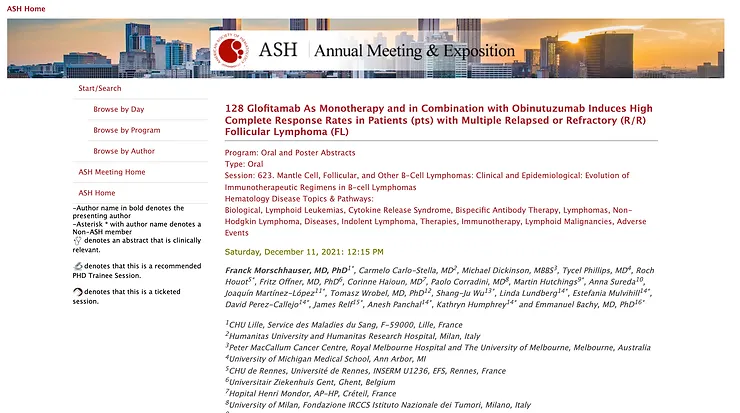 Figure 1
 Figure 2
 Figure 3
 Figure 4